Adding and Organizing Your Tasks
A task manager is only as good as the system behind it. Principal Task gives you five dimensions to organize your work — folders, contexts, priorities, statuses, and stars — so every task has a place, and every place means something. This article covers the full range, from capturing a task in seconds to structuring it exactly the way your work requires.
Creating a Task
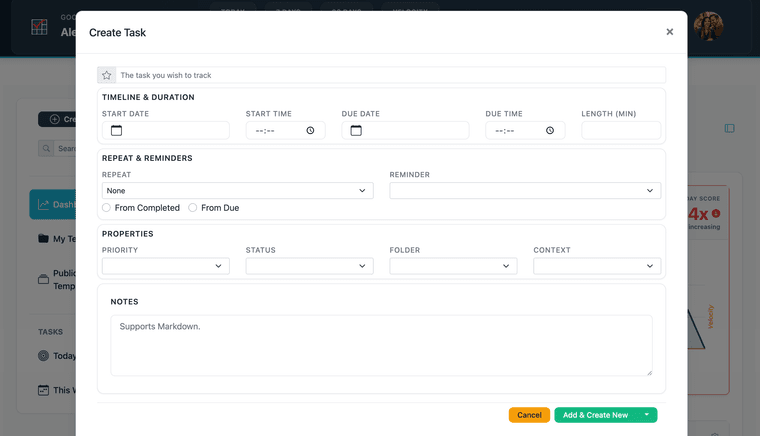
On web, click + Create Task at the top of the left sidebar. The Create Task modal opens. The task title is the only required field — everything else is optional and can be added later. Click Add & Create New to save and immediately start another task, or click the dropdown on that button and choose Add & Close to save and close the modal.
On mobile: Tap the green + button in the bottom-right corner of the screen. The Create Task screen opens. You can also long-press the + button to open a simplified title-only form — useful when you want to capture something quickly without leaving your current screen.
Adding Task Details
Every task has a title and a set of optional fields. The following fields are available on both web and mobile:
Title — The task name. Required.
Timeline & Duration section:
- Start Date — When you plan to begin. Tasks with a start date appear in views filtered by time window.
- Start Time — A specific start time when needed.
- Due Date — When the task must be done. Due dates drive the Today, Today's Focus, and This Week views. On the mobile Create Task screen, this field is labeled End Date — it refers to the same value.
- Due Time — A specific due time.
- Length (Min) — Expected duration in minutes.
Repeat & Reminders section:
- Repeat — How often the task recurs. Options include daily, weekly, biweekly, monthly, bimonthly, quarterly, semiannually, and yearly.
- Reminder — When to send a push notification. Requires push notifications to be enabled on your device.
Properties section:
- Priority — Urgency level: Negative, Low, Medium, High, or Top.
- Status — Workflow state: None, Next Action, Active, Planning, Delegated, Waiting, Hold, Postponed, Someday, Canceled, or Reference.
- Folder — Which folder the task belongs to.
- Context — Which context tag to apply.
Notes — Freeform notes about the task. Supports Markdown. See Richer Notes with Markdown for details.
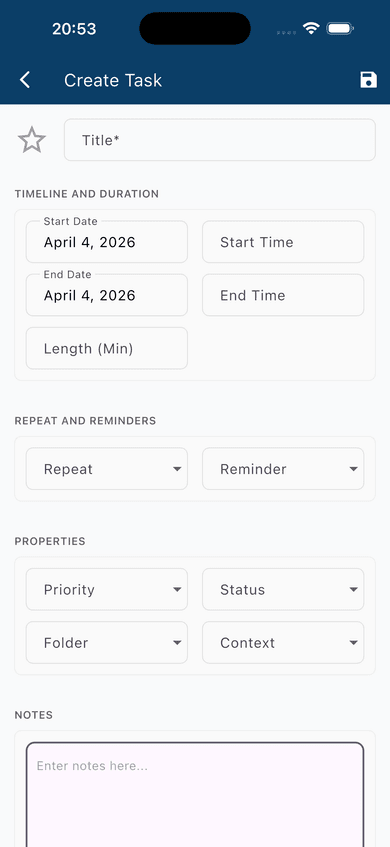
On mobile: On mobile, task fields are organized into sections: Timeline & Duration, Repeat & Reminders, Properties, and Notes.
Folders
Folders group tasks by project, area, or any category that makes sense for your work. To assign a folder, select one from the Folder dropdown in the task detail view. For full guidance on creating and managing folders, see Organize by Project and Area with Folders.
Contexts
A context is a tag that describes the situation in which you can do a task — @Home, @Computer, @Errands, or whatever fits your workflow. Assign a context from the Context dropdown in the task detail view. For a full guide to using contexts effectively, see Do the Right Work at the Right Time.
Priorities
Priority reflects the urgency and consequence of a task. Five levels are available: Negative, Low, Medium, High, and Top. Tasks without a priority set are unranked. For guidance on using priorities effectively, see Keep What Matters Visible: Priorities and Stars.
Statuses
Status tracks where a task sits in your workflow. Principal Task provides eleven predefined statuses: None, Next Action, Active, Planning, Delegated, Waiting, Hold, Postponed, Someday, Canceled, and Reference. These are drawn from GTD (Getting Things Done) conventions, but you can use whichever ones fit your process and ignore the rest.
Starring a Task
The star icon marks a task as one you are actively committed to. Tap or click the ☆ star icon next to a task title to star it — it fills in to confirm the star is set. Use starring to identify your short list for the day: the three to five tasks you have decided you will finish.
On web, the star icon appears at the left of the task title, both in the task row and in the expanded detail view. On mobile, it is at the top-left of the task editor. For more on combining stars with priorities, see Keep What Matters Visible: Priorities and Stars.
Subtasks
Any task can have subtasks, and subtasks can have their own subtasks — there is no depth limit. On web, expand a task and use the task's overflow menu to add a subtask. On mobile, open a task and tap the Subtasks tab in the bottom navigation bar, then tap the + button. For full instructions, see Break Any Project Down with Subtasks.
Task Templates
Templates let you define a reusable task structure — with subtasks, priorities, statuses, and other fields already set — and stamp it out with a single tap. Templates preserve the full subtask hierarchy. For full instructions, see Task Templates: Build Once, Use Every Time.